���ں� Wordpress����ʼ��װ����ˣ����ֱ�ӱ���
Installation failed: Could not create directory
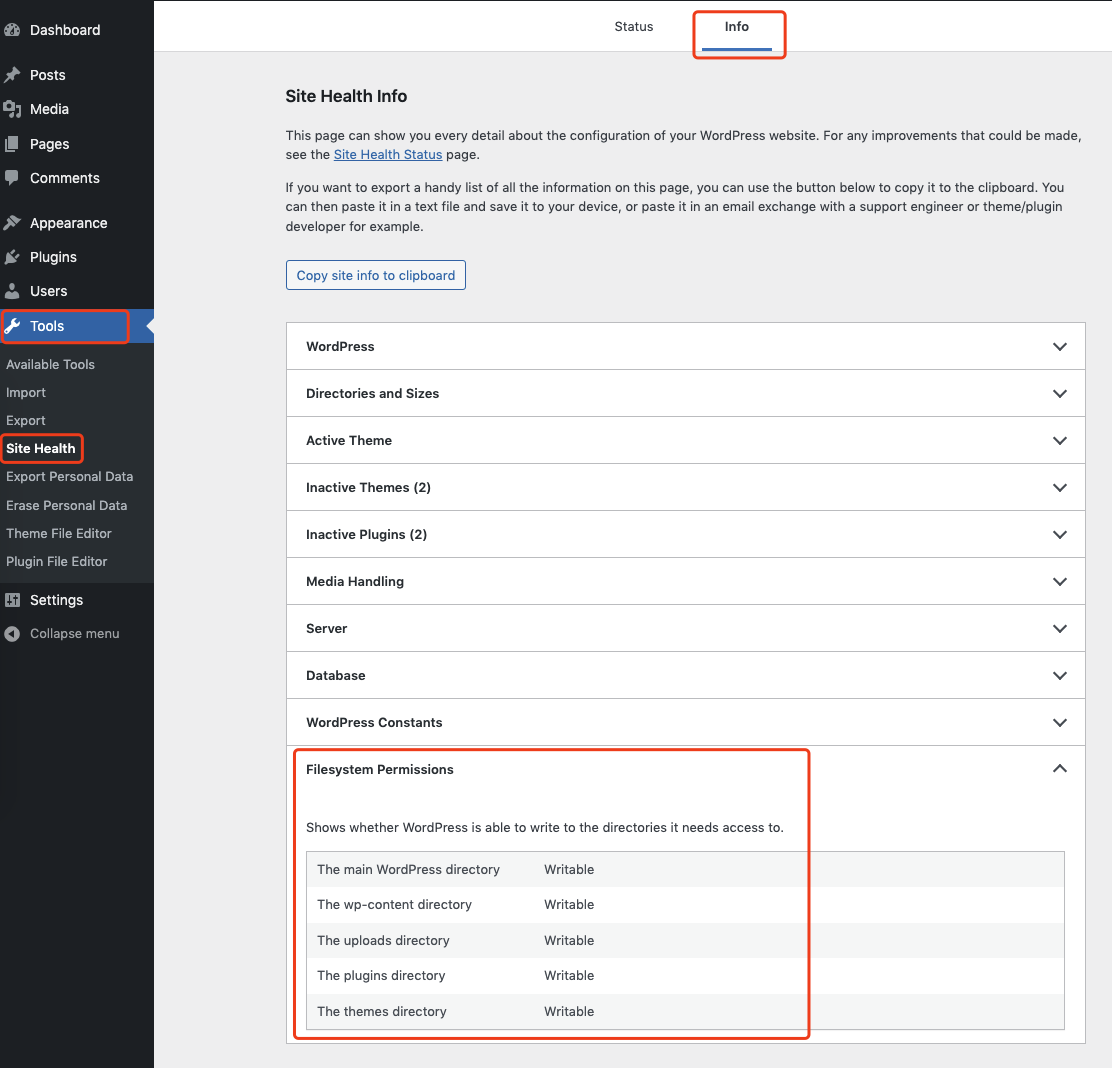
��ʱվ�㽡������(Site Health)����ļ�ϵͳȨ��(Filesystem Permissions) ȫ�� Not Writable
����һȦ����ƪ���½�����ҵ����⣺
Linux��д��Ȩ������ & ���Wordpress�����Զ���װ���⡢���
Author��flymorn Source��Ʈ��
�� �ģ�
�����wordpress������������ʱ��
- �����ϴ�ͼƬ
- �����Զ���װ���⡢�������ҪFTP�˻���
- �����Զ�����
- �����κ���Ҫwordpressд�ļ�������
��Щ�����������һ��ԭ�����wordpressĿ¼�����ڵ�ǰ���û����飬��web���ʵ��û�û��Ȩ����wp��һ����ҪдȨ�IJ�������ʵ����linux��Ȩ���㣬��д����ɵġ�
���������
������Ҫ����rootȨ�ޣ�SSH��¼�����뵽wp�İ�װĿ¼��
cd /var/www/html/my_wp_blog
�������е�дȨ�ޣ�
chmod 777 wp-content
����������IJ��͵������ϴ�һ��ͼƬ��WP������һ��Ŀ¼��Ȼ��鿴���ĸ��û��������ļ��С�һ������£�����û����С�apache����Ҳ�в����˷�������û��ǡ�nobody������Ʈ�ױ������������⣬����VPS�ϰ�װ����LNmp������û��ǡ�www����
���뵽wp��wp-contentĿ¼���鿴��Ŀ¼�������ļ�/�ļ��е�Ȩ�ޣ������û����û��飺
cd wp-content
ls -l
total 16
-rw-r�Cr�C 1 root root 30 May 4 2007 index.php
drwxr-xr-x 3 root root 4096 Feb 10 19:31 plugins
drwxr-xr-x 5 root root 4096 Mar 23 03:04 themes
drwxrwxrwx 3 www www 4096 Mar 24 02:08 uploads
ע���ϴ�Ŀ¼ uploads ���û� www �����ġ�
��������wp-contentȨ��ԭ�� 755��:
cd ..
chmod 755 wp-content
��������ʵ�����������ˣ��ı�wp�����ļ��е�ӵ����Ϊ���ҵ�������û�www��
cd ..
chown -R www:www my_wp_blog
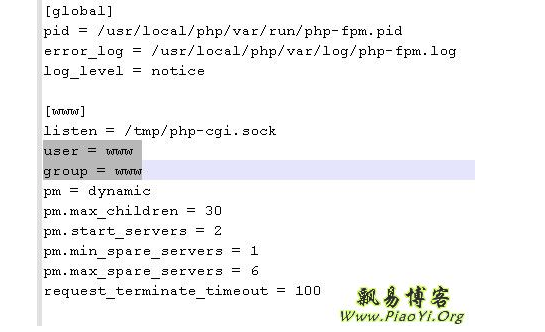
��ע������������һ�ֲ��ҵ�ǰ�û���������Ƶķ�����
��
/usr/local/php/etc/php-fpm.conf
������ user��group������ǵ�ֵ��ʲô������ͼ��
Linux��д��Ȩ������ & ���Wordpress�����Զ���װ���⡢���
OK���������ˡ�������Ӣ�ĵ�ԭ�ģ�
There are a wide variety of problem reports appearing on support forums related to Wordpress that all have one root cause and solution. Here are some common issue descriptions:
- Problems uploading images
- Problems installing themes, plugins
- Problems auto-upgrading Wordpress
- Anything else where Wordpress needs to write files
And here is a typical error message:
��To perform the requested action, connection information is required.�� Or��
��Unable to create directory [...]. Is its parent directory writable by the server?��
The problem is that Wordpress is executing in the context of your web server process, but the directories have write permissions based on the user context used to originally create the directories.
Many of the suggested solutions on the web simply won��t work, while other solutions work but create security problems with your Wordpress installation. Here is the full solution that should work on all Linux systems, regardless of the specific environment.
What we are going to do is give your web server ownership of the directories and files of your Wordpress install. This requires you to be knowledgeable and comfortable in your bash shell environment, which is probably reasonably true if you installed Wordpress yourself.
First we will give everybody write access so that WP can write the content directories. Some solutions on the web stop at this step, but this leaves your files with no filesystem security. We are only doing this briefly in order to determine what user context is being used by the web server.
Go to your Wordpress root directory:
cd /var/www/html/my_wp_blog
Give the world write access to the content directory:
chmod 777 wp-content
Now log into Wordpress and upload a photo to a blog post, causing WP to create the new directories required. Then look on the server to see what user created the directories. This would commonly be apache, but also many people are reporting that this is the user ��nobody�� on their server.
cd wp-content
ls -l
total 16
-rw-r�Cr�C 1 root root 30 May 4 2007 index.php
drwxr-xr-x 3 root root 4096 Feb 10 19:31 plugins
drwxr-xr-x 5 root root 4096 Mar 23 03:04 themes
drwxrwxrwx 3 apache apache 4096 Mar 24 02:08 uploads
Notice