该控件位于给定ID控件的上方
android:layout_below 该控件位于给定ID控件的下方
android:layout_centerHorizontal 该控件是否横向居中
android:layout_centerVertical 该控件是否垂直居中
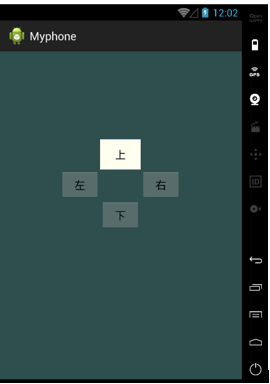
实例代码:
<RelativeLayout xmlns:android="http://schemas.android.com/apk/res/android"
    android:layout_width="match_parent"
    android:layout_height="match_parent"
    android:background="@color/darkslategray" >

    <Button android:id="@+id/btn1"
        android:layout_width="wrap_content"
        android:layout_height="wrap_content"
        android:layout_centerInParent="true"
        android:layout_centerHorizontal="true"
        android:text="下">
    </Button>
    <Button android:id="@+id/btn2"
        android:layout_width="wrap_content"
        android:layout_height="wrap_content"
        android:layout_toLeftOf="@id/btn1"
        android:layout_above="@id/btn1"
        android:text="左">
    </Button>
    <Button android:id="@+id/btn3"
        android:layout_width="wrap_content"
        android:layout_height="wrap_content"
        android:layout_toRightOf="@id/btn1"
        android:layout_above="@id/btn1"
        android:text="右">
    </Button>
    <Button android:id="@+id/btn4"
        android:layout_width="wrap_content"
        android:layout_height="wrap_content"
        android:layout_toRightOf="@id/btn2"
        android:layout_above="@id/btn2"
        android:background="@color/white"
        android:text="上">
    </Button>

</RelativeLayout>
效果图
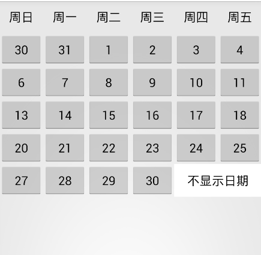
(3)表格布局
表格布局是最规整的一种布局方式。想象一下EXCEL表格规整的行和列,android布局管理器中的TableLayout与EXCEL中的单元格有不少相似之处。如果学过HTML,用过tbale,tr,td标签,应该也会对下面的用法有更好的理解。
表格布局由一个TableLayout包裹起来,内部是一行行的控件,每一行用一个TableRow来包裹,每一行的元素个数(即列数)都是可以不同的。默认情况下,一行中的所有控件是等宽的。
控件属性,在TableLayout中定义,对所有行起作用:
1. android:collapseColumns=”” #指定被隐藏的列的序号
2. android:shrinkColumns=”” #指定被收缩的列的列序号
3. android:stretchColumns=”” #指定被拉伸的列的列序号
4. android:layout_column="3": #表示跳过第三个控件,直接显示下一个控件,注意:这个属性从1开始计数
5. android:layout_span="3" #表示合并3个单元格,也就说这个组件占3个单元格
注意:上面属性的使用场合,是在TableLayout还是在TableRow中使用;如果是在TableRow中使用,需要在TableRow的子控件中添加属性。前四个属性都是添加在TableLayout中的,最是添加在TableRow的子控件中。
实例:
就以我们平常用的日历为案例(由于屏幕太小,放不下最后一列星期六的日期)
实例代码:
由于以下代码有很多相似之处,我只截取了比较重要的一部分
1. 总体框架
<TableLayout xmlns:android="http://schemas.android.com/