为什么使用MVVM
iOS中,我们使用的大部分都是MVC架构。虽然MVC的层次明确,但是由于功能日益的增加、代码的维护,使得更多的代码被写在了Controller中,这样Controller就显得非常臃肿。
为了给Controller瘦身,后来又从MVC衍生出了一种新的架构模式MVVM架构。
MVVM分别指什么
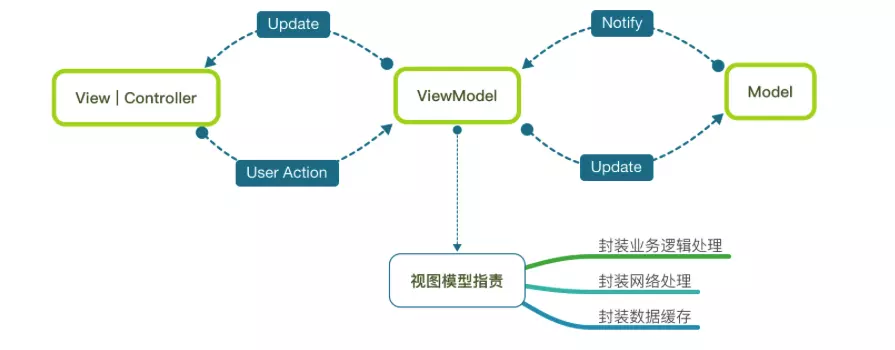
MVVM就是在MVC的基础上分离出业务处理的逻辑到ViewModel层,即:
Model层:请求的原始数据
View层:视图展示,由ViewController来控制
ViewModel层:负责业务处理和数据转化
简单来说,就是API请求完数据,解析成Model,之后在ViewModel中转化成能够直接被视图层使用的数据,交付给前端(View层)。
MVVM与MVC的不同
首先我们简化一下MVC的架构模式图:
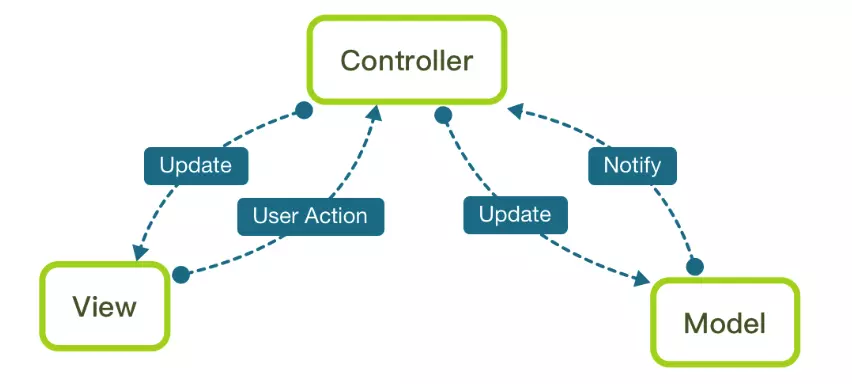

在这里,Controller需要做太多得事情,表示逻辑、业务逻辑,所以代码量非常的大。而MVVM:

MVVM的实现
比如我们有一个需求:一个页面,需要判断用户是否手动设置了用户名。如果设置了,正常显示用户名;如果没有设置,则显示“博客园0122”这种格式。(虽然这些本应是服务器端判断的)
我们看看MVC和MVVM两种架构都是怎么实现这个需求的
MVC:
Model类:
#import <Foundation/Foundation.h>

@interface User : NSObject

@property (nonatomic, copy) NSString *userName;
@property (nonatomic, assign) NSInteger userId;

- (instancetype)initWithUserName:(NSString *)userName userId:(NSInteger)userId;

@end
@implementation User

- (instancetype)initWithUserName:(NSString *)userName userId:(NSInteger)userId {
    self = [super init];
    if (!self) return nil;
    _userName = userName;
    _userId   = userId;
    return self;
}

@end
ViewController类:
#import "HomeViewController.h"
#import "User.h"

@interface HomeViewController ()

@property (nonatomic, strong) UILabel *lb_userName;
@property (nonatomic, strong) User *user;

@end
@implementation HomeViewController

- (void)viewDidLoad {
    [super viewDidLoad];

    //创建User实例并初始化
    if (_user.userName.length > 0) {
        _lb_userName.text = _user.userName;
    } else {
        _lb_userName.text = [NSString stringWithFormat:@"博客园%ld", _user.userId];
    }
}

@end
这里我们需要将表示逻辑也放在ViewController中。
MVVM:
Model类:
#import <Foundation/Foundation.h>

@interface User : NSObject

@property (nonatomic, copy) NSString *userName;
@property (nonatomic, assign) NSInteger userId;

@end
ViewModel类:
声明:
#import <Foundation/Foundation.h>
#import "User.h"

@interface UserViewModel : NSObject

@property (nonatomic, strong) User *user;
@property (nonatomic, copy) NSString *userName;

- (instancetype)initWithUserName:(NSString *)userName userId:(NSInteger)userId;

@end
实现:
#import "UserViewModel.h"

@implementation UserViewModel

- (instancetype)initWithUserName:(NSString *)userName userId:(NSInteger)userId {
    self = [super init];
    if (!self) return nil;
    _user = [[User alloc] initWithUserName:userName userId:userId];
    if (_user.userName.length > 0) {
        _userName = _user.userName;
    } else {
        _userName = [NSString stringWithFormat:@"博客园%ld", _user.userId];
    }
    return self;
}

@end
Controller类:
#import "HomeViewController.h"
#import "UserViewModel.h"

@interface HomeViewController ()

@property (nonatomic, strong) UILabel *lb_userName;
@property (nonatomic, strong) UserViewModel *userViewModel;

@end
@implementation HomeViewController

- (void)viewDidLoad {
    [super viewDidLoad];

    _userViewModel = [[UserViewModel alloc] initWithUserName:@"liu" userId:123456];
    _lb_userName.text = _userViewModel.userName;
}

@end